Poster 2.0
The printed poster, the major medium for visual communication in public space for many centuries, is
experiencing a fundamental transformation in the digital age. The "Poster 2.0"* is much more than a
surface with type, colours and images on it. It is an interactive application, animated, audible, data
driven and intermedial. It involves all senses and disciplines. It melts together graphic design with
new technologies.
*This term is first mentioned in a PAGE article (April 2019) by designer, educator, and developer
Tim Rodenbröker. PAGE is a German magazine for the creative industry
Project Framework
Conclusion/reflection
The power of Poster 2.0 is that there are new possibilities the create more dynamics between work (poster) and audience. The designer is able to discover new ways to express himself, a certain topic, or create visuals (identities). During this process I learned that there is still a lot to be discovered. The different functions I used are not only powerful in their own use, but they can also be combined together. This can create even more variety and customization possibilities. In a growing digital environment, it is likely these hybrid visualisations will benefit the design practice in the near future.
Test 1.0
Rasterizing an image. By analysing the pixel-data, determining the brightness values, and the
horizontal/vertical coordinates of the mouse position, it is possible to create a dynamic poster where
the size of individual raster’s cells can be controlled. This by using the map()-function. This
function allows you to move a given range of values into a new range of values.
The map()-function takes 5 parameters.
- The first parameter is the input value to be converted.
- Parameters 2 and 3 define the minimum and maximum value of the original value range.
- Parameters 4 and 5 define the minimum and maximum value of the desired value range.
map(input, min1, max1, min2, max2);
Poster
Poster still
Poster mock-up
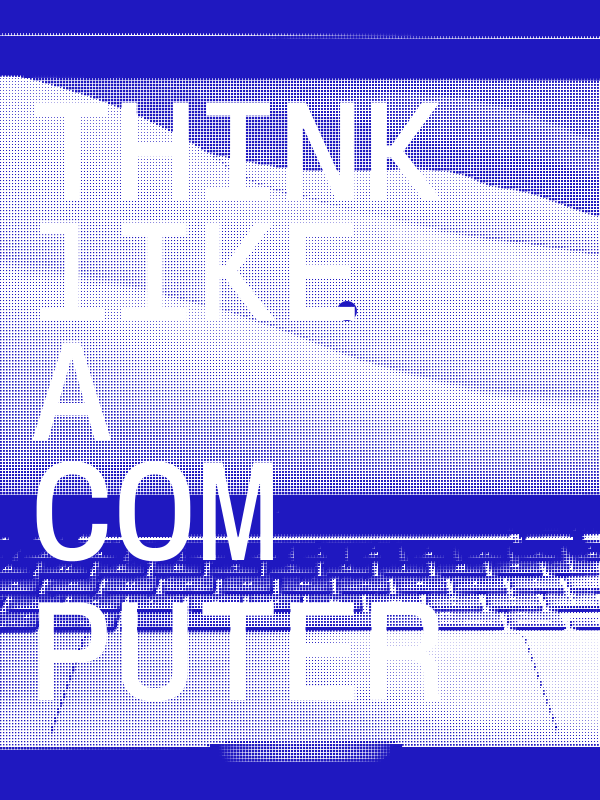
Test 2.0
In this example, I use the brightness value of each pixel of the image to decide whether to fill the tile in the grid white or blue. This creates a threshold effect. By adding a waveform motion (with the functions: sin, cos, and tan) it is possible to create more dynamic motion sequences.
Poster 1 using sin-function
Poster 2 using cos-function
Poster 1 mock-up
Test 3.0
Rasterization effect, but this time using a waveform motion and the horizontal/vertical coordinate of the mouse position.
Rasterization tan()-function
Rasterization tan()-function
Rasterization sin()-function
Rasterization sin()-function
Rasterization cos()-function
Rasterization cos()-function
Test 4.0
The Microsoft Kinect sensor is a peripheral device (designed for XBOX and windows PCs) that functions
much like a webcam. However, in addition to providing an RGB image, it also provides a depth map.
Meaning for every pixel seen by the sensor, the Kinect also measures distance from the sensor. The
Kinect sensor itself only measures colour and depth. However, once that information is on your computer,
lots more can be done. For this experiment I used the original Kinect V1 (1414).
All the functions within the Processing kinect library:
- initDevice() — start everything (video, depth, IR)
- activateDevice(int) - activate a specific device when multiple devices are connect
- initVideo() — start video only
- enableIR(boolean) — turn on or off the IR camera image (v1 only)
- initDepth() — start depth only
- enableColorDepth(boolean) — turn on or off the depth values as color image
- enableMirror(boolean) — mirror the image and depth data (v1 only)
- PImage getVideoImage() — grab the RGB (or IR for v1) video image
- PImage getIrImage() — grab the IR image (v2 only)
- PImage getDepthImage() — grab the depth map image
- PImage getRegisteredImage() — grab the registered depth image (v2 only)
- int[] getRawDepth() — grab the raw depth data
- float getTilt() — get the current sensor angle (between 0 and 30 degrees) (v1 only)
- setTilt(float) — adjust the sensor angle (between 0 and 30 degrees) (v1 only)
kinect.initVideo();
kinect.initDepth();
kinect.initVideo(); + brightness
kinect.initDepth(); + brightness
kinect.initDepth(); + brightness + 3D space
kinect.initDepth(); + brightness + 3D space + higher contrast
(pointcloud) int[] depth = kinect.getRawDepth(); + int offset = x + y*kinect.width;
(pointcloud) int[] depth = kinect.getRawDepth(); + int offset = x + y*kinect.width;
(pointcloud) int[] depth = kinect.getRawDepth(); + int offset = x + y*kinect.width;
(pointcloud) int[] depth = kinect.getRawDepth(); + int offset = x + y*kinect.width; + text
(pointcloud) int[] depth = kinect.getRawDepth(); + int offset = x*kinect.height + y;
Test 5.0
Using Processing to create kinetic typography visual posters. Kinetic Typography is a term for moving, flexible typographic systems.
Test 6.0
LED
sin() + cos()
cos() + tan()
cos() + tan() + mouse position
cos() + tan() + text
Test 7.0
Load Data using Processing. By using the loadString() it reads the contents of a file and creates a String array of its individual lines.
String [] data;
data = loadStrings("file.txt");
(Martin Heidegger) load text data
(Walter Benjamin) load text data
Array of Images + mouse position (Transition Of Values)
Array of Images + mouse position (Transition Of Values)
Test 8.0
Using the copy()-function. Copies a region of pixels from one image into another. To use it, you need to specify three things:
- The motif from which a section is to be displayed.
- The position and size of the section to be displayed
- the destination where it should be displayed
copy(img, sx, sy, sw, sh, dx, dy, dw, dh);
Copy()-Function with background
Copy()-Function no background